

I demonstrated all of the what NOT to dos, and showed how to turn a jewelry making DON'T into a jewelry making DO. And of course, once I get talking, I get talking, so I gave a few extra bonus DON'Ts and DOs as well! This is a great video to watch both if you are just getting started, as well as if you need to brush up on your crimping skills.
The most important takeaway message: The right beading wire + the right crimp bead/tube + the right Crimp Tool = the best jewelry!
1. Don't use a chain nose or flat nose pliers to flatten the crimp. Always use a crimp tool instead.
When you flatten the wires in the crimp, not only is it likely that they are crossed, but when you smash the crimp down, it breaks the wires leading to weakening and breaking of the wires. When you use a crimp tool, the wires are nestled separately in each side of the crimp. No extra stress is put on the wires, so they are much less likely to break.

2. Don't add a clasp without leaving wiggle room on the strand of beads. The beads need room to move once the clasp is attached.
In the video, I actually talked first about having wiggle room between the crimp and the clasp and adding a Wire Guardian. I circled back around at the end to talk about why it's important to have wiggle room in the strand of beads. You need wiggle room in both places to keep tension off of the wire and to give the beads room to breathe. Bead Bumpers are a great way to add that wiggle room into the beaded design.
3. Don't guess on the size of crimp beads & tubes. Check the label on the Beadalon Beading Wire for the correct size to use.

All of the Spools of Beading Wire indicate which size crimp to use. Double check with the packages of crimps to make sure you're using the right size.
4. Don't use one crimp tool for all projects. The Micro, Standard and Mighty Crimper work specifically for particular sizes of crimp beads/tubes.
This handy chart is a great reminder of which tool works for each size.

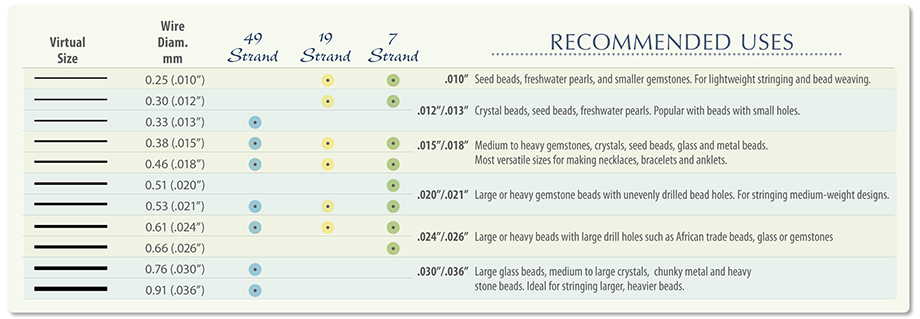
5. Don't stick with one size beading wire for all designs. Choose the largest diameter that will fit the smallest bead hole used in your design.
This is a very important tip for minimizing the chance for breakage. I use a .024 49 Strand Wire for almost all of my designs since I mostly string with Swarovski Crystal Beads and gemstones. Once again, we have a handy chart that shows the recommended wires for different beads. I said it before, and I'll say it again and again - chose beading wire that will fill up the holes of your beads as much as possible to minimize friction.
Phew! That's a lot of information for such a seemingly simple part of beading. But, it really is the most important part of jewelry design. Taking a little bit of extra time with you finishing technique will go a long way toward making jewelry designs that last and last!
See you next time from Tucson!
Happy beading!
Meredith
Comments
Post a Comment